

HONESTY IS THE ROOT
Quality is always satisfactory
Hotline
400-606-8981
PRODUCT CATEGORY
LATEST NEWS
MORE
PRODUCT DETAILS
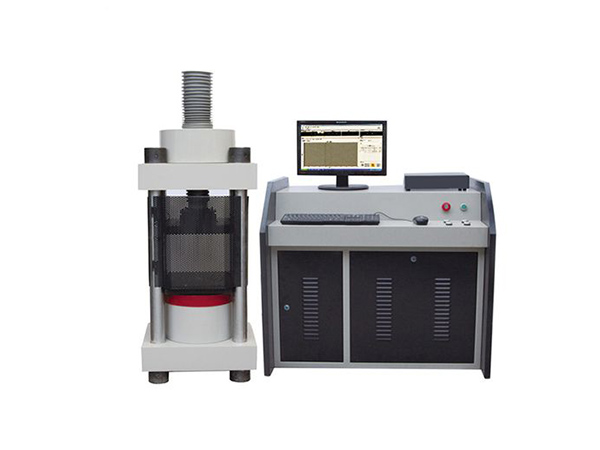
1、 Main purpose: The DYE-2000S computerized constant stress pressure testing machine is used to determine the compressive strength of building materials such as bricks, stones, and concrete. This machine is used for electric hydraulic loading, sensor force measurement, digital display of force values, printer printing of force value data, and conversion of compressive strength. This testing machine complies with the national standard "Standard for Test Methods of Mechanical Properties of Ordinary Concrete", and should manually control the loading speed. It also has a loading speed indicator device, peak holding, and overload protection functions. It is a testing and inspection equipment required by construction, building materials, highway bridges, and other engineering units
2. Main technical parameters
1. Large load: 2000KN
2. Accuracy of indication: Main product
3. Small resolution: 0.1KN
4. Large distance between pressure plates: 320mm
5. Specification of upper and lower pressure plates: 220 × 250mm
6. Piston diameter * large stroke: diameter 250 × 30mm
7. Motor power: 0.75KW
8. Input voltage: 380V
9. Dimensions: 880 × 480 × 1400mm
10. Net weight: 850kg
III. Structure introduction
The testing machine is mainly composed of three parts: an organic body (based on actual reports), a hydraulic control box, and a force measuring instrument.
1、 The body of the testing machine is connected to the upper beam by four columns. The upper beam of the testing machine is equipped with an adjusting screw, a large hand wheel, and a nut screw to adjust the no-load height of the testing machine. The lower end of the screw is equipped with a ball seat and an upper pressure plate. The lower pressure plate is placed on the piston of the oil cylinder. When the specimen comes into contact with the upper pressure plate, the upper pressure plate seat can self adjust and balance, keeping the specimen horizontal with the upper and lower pressure plates. The lower pressure plate is engraved with a marking line for locating the test piece. During the test, the test piece should be aligned with the marking line. A dust cover is installed under the lower pressure plate to prevent or reduce dust from entering the oil cylinder and damaging the cylinder body or oil seal during piston lifting. There is a sealing device between the piston and the oil cylinder to prevent oil leakage (based on actual reports). However, when there is still a trace of oil leakage from the piston during use, there is a circular oil groove in the cylinder body and a drainage channel to discharge and flow back to the large oil tank
2、 Hydraulic control part
The control box of this testing machine mainly consists of an oil tank, an oil pump, an oil filter, an electric motor, a speed valve, a return valve, etc. The oil pump is a direct rotating axial five column pump. When the testing machine is loaded, the loading speed valve should be manually controlled to deeply control the speed of piston rise (this speed is integrated with the Anran valve). When unloading, the return valve can be rotated, and the oil cylinder will slowly descend. The testing machine has already adjusted the Anran valve to the appropriate position at the factory, and users cannot adjust the Anran valve during normal use
3、 Please refer to the instrument manual for details on the instrument section.
4. Installation of the testing machine.
1. When lifting the testing machine, insert the lifting wire into the lifting ring screw at the top of the screw rod
2、 The testing machine is installed on a stable foundation about 20 centimeters above the ground, and two M16 anchor bolts should be pre embedded. The dimensions are shown in the foundation diagram
3、 When installing the testing machine, use a 1/1000 frame level to measure the plane of the lower pressure plate, so that the lower pressure plate is in a horizontal state. If it is not horizontal, adjust it with a pad (pad iron is placed under the nut under the column), and then tighten the testing machine to the foundation
Fifth, Operation Steps
1. Add clean 46 # anti-wear hydraulic oil to the oil tank at the filling port to the liquid level shown in Figure 2.
2、 Connect the power supply to start the motor (power voltage 380V 50Hz)
3. Close the return valve and turn the speed valve counterclockwise to supply oil, causing the piston to lift away from the cylinder bottom
4、 Place the specimen in place, adjust the height of the screw, and adjust it to a distance of 1-2mm from the upper pressure plate
5、 When the specimen has not yet come into contact with the upper pressure plate, the speed of the adjustable speed valve can be increased appropriately. After the specimen comes into contact with the upper pressure plate, the speed valve can be adjusted appropriately according to the loading speed to load until the specimen is crushed
6、 After the specimen is broken, open the oil return valve to make the piston fall back. After removing the broken specimen, close the oil return valve to proceed with the next test. When opening the oil return valve, ensure that the speed is slow
6.
Maintenance:
1. The testing machine is installed in a clean, dry, and uniformly warm environment with no vibration or corrosive gases around it
2、 The testing machine should be kept clean, and parts without protective layers on the surface of the testing machine should be regularly wiped with oil to prevent rust and corrosion
3、 Use anti-wear hydraulic oil with a specification of 46 #
4、 The upward position of the piston of the testing machine shall not exceed 30mm. A limit scale shall be installed on the control box of the testing machine. When the arrow reaches the limit, the return valve shall be slowly released immediately to allow the piston to descend before starting the motor for the next test
Calibration of Testing Machine
1. This testing machine is calibrated once a year
2、 The calibration of the testing machine should be carried out under the following conditions:
(1) Within the temperature range of 20 ± 10 ℃ at room temperature(2) In an environment with a relative humidity of ≤ 80%(3) In a vibration free environment(4) The fluctuation of the power supply voltage shall not exceed ± 10% of the rated voltage, and the voltage shall be relatively stable
3、 Preheat the instrument for 30 minutes after connecting the power supply, and adjust it to zero according to the usage method
4、 Start the motor and repeat the loading process three times until a larger load is reached, then adjust the load display to zero and begin calibration
5、 This testing machine only performs process indication relative error and relative variability calibration. The calibrated results should reach:
Relative error of indication: ≤ ± 1%
Relative variability of indication: ≤ ±1%