

HONESTY IS THE ROOT
Quality is always satisfactory
Hotline
400-606-8981
PRODUCT CATEGORY
LATEST NEWS
MORE
PRODUCT DETAILS
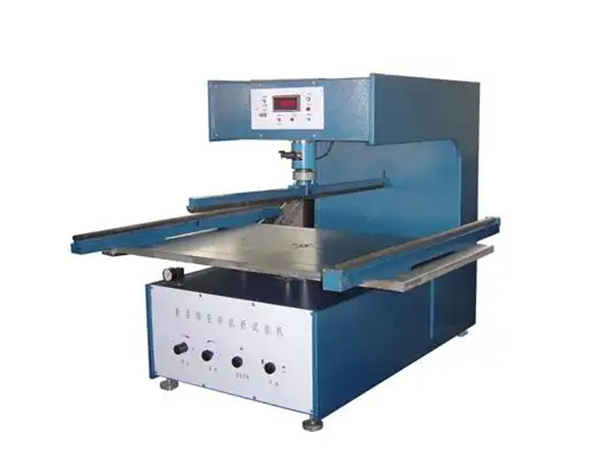
1、 Overview
The TZS-10 digital display ceramic tile flexural tester (hereinafter referred to as the flexural tester) is mainly used to measure the flexural strength of brittle non-metallic plates such as ceramic tiles and glass. This machine complies with the requirements of the national standard GB/T3810.4-2006 "Test methods for ceramic tiles - Part 4: Determination of modulus of rupture and strength at break" and the reputation standard ISO 10545-4:1995 "Ceramic tiles - Part 4: Determination of modulus of rupture and strength at break" for testing equipment
II. Main Technical Parameters
(1) Large Test Force: 9999N (Accuracy 1N) 20KN (Accuracy 10N)
(2) Workbench Travel: ≥ 65mm
(3) The radius of the supporting roller and the pressure knife roller is R15mm (with 5mm thick rubber on the outer surface)
(4) The distance between the two supporting rollers is 160-730mm (adjustable)
(5) Peak holding time (automatically when the specimen breaks)
(6) Power supply: AC 50HZ 220V
(7) Large size of the specimen: 800 ⅹ 800mm
III. Structure description
The anti bending testing machine is composed of two parts: the main machine and the force measurement digital display (installed on the upper part of the main machine)
The host consists of a motor, a gearbox base, a worktable, support rollers, a pressure roller, a column, sensors, and other components., When conducting tests on the same batch of bricks, the distance between the upper and lower pressure rollers should be moderate, and the workbench should not be lowered to a lower position to save testing time. One of the two supporting rollers can rotate around its own axis, while the other can swing up and down slightly around the pivot point; The upper pressure roller blade can also swing slightly up and down around the fulcrum. Each roller working surface is covered with a 5mm thick hard rubber layer The force measurement digital display part consists of a pressure sensor with suitable accuracy and a digital control box. This section has functions such as correction, removal, storage, adjustment, power switch, function switch, etc 4. Working principle: When ceramic tiles and other brittle materials undergo three-point bending tests, if the test force is greater than or equal to the excellent value of a certain sample, they will suddenly fracture. According to the larger load F at the time of experimental fracture, the bending strength of the brick can be calculated using the following formulaσ=-- MPa
σ - bending strength, MPa
F - larger load at the time of specimen fracture, N
L - fulcrum distance, mm
b - specimen width, mm
H - small thickness of specimen fracture surface, mm
This testing machine divides its force application and measurement into two separate systems. Force application is achieved through a deceleration transmission system
When the up switch is pressed, the motor drives the worktable and the test sample on it to rise through the variable speed system. When the sample comes into contact with the upper pressure roller, the test force is applied to the sample until it fractures. After the sample fractures, the motor automatically stops the worktable from rising, and the data is automatically retained. Pressing the descent switch causes the worktable to move downwards to a certain position, and then pressing the stop switch stops the worktable from descending. This completes the entire process of force application and unloading The force measurement digital display part adopts a force measuring instrument developed with precision suitable for non electric electrical measurement and peak measurement technology. It converts the pressure acting on the sample with a suitable speed change into an electrical signal through an accurate sensor, amplifies it with an amplifier, and sends it to an analog holding circuit for analog-to-digital conversion. When the sample breaks and the pressure suddenly drops due to the peak holding circuit, the discriminator outputs a large signal collected by a latch digital meter, which achieves a large force value time holdingFifth, Installation, Debugging and Calibration of Testing Machine
1. Installation and Leveling of Testing Machine
Leveling
After disassembling the testing machine, first check whether the pipe joints and connecting screws at all places are loose.
. Then place the testing machine on a sturdy platform. Before installing the pressing roll and backup roll components, place a level on the workbench, adjust the four foundation screws, lock the nuts on the foundation screws, and install the pressing roll and backup roll components Connect the power supply and use a copper wire with a cross-sectional area of not less than 1.5mm2 to properly ground the testing machine At the moment when the specimen is torn, the instrument collects the peak tensile force of the specimen and automatically maintains it unchanged, recording and holding: Press the "Save" button, and the instrument will record the values collected in this experiment Press the 'Remove' button to enter the next experimental preparation program for the instrument Each group consists of five tests. When the fifth test is completed and the "Save" button is pressed, the displayed value is the average value of this test, which is the test result of the group of specimens Note: If there is an incorrect value in the experiment, simply press the "remove" button, and the value of the experiment will not be recorded. Wait until the cause is identified before conducting the experiment. It is necessary to press the "store" button five times in a row to obtain the average value Pressure calibration:1、 Press and hold the "Fix" button to turn on the device; Then wait for 3-5 minutes to stabilize the instrument
2、 Press and hold the "Correction" button to turn on the device for 2 seconds, then press "Remove" to hang the standard weight, press the "Correction" button again, and press "Correction" again to display the excellent digital display flashing in the lower row of the window, and R-2 displayed in the lower row of the window; Replace the mass of the standard weight with tensile force, and then fill in the obtained value in the upper display box: for example, replace a weight with a mass of 10KG with a tensile force of 10 × 9.8=98N, and fill in the displayed value as 0098. If the mass of the same weight is 30KN, the tensile force is 294N, which is 30 × 9.8. Fill in the displayed value as "0294" N, complete the input, and press the "Correction" button to complete the calibration. The metrologist can directly calibrate the sensor of the standard load cell
The precision of force testing for the testing machine has been calibrated before leaving the factory. If the user needs to calibrate, a standard dynamometer that has been verified by the metrology department is required for calibration6. Use of Testing Machine
Install and debug the testing machine according to the above steps to put it into use. When conducting sample testing, follow the steps below.
1. Connect the power and preheat the instrument for 5-10 minutes. If there is a drift in the pressure display window, press the down/down button to reset it.
2. Press the up switch to raise the worktable. When the sample comes into contact with the upper pressure roller, loading begins until the sample breaks.
3. At the moment of sample fracture, the numbers on the digital display screen remain stationary (i.e., the greater fracture force of the sample), and the holding light remains on, maintaining the greater force value 4. Press the descent switch to lower the workbench. After recording the numbers on the digital display head, the experimenter presses the "reset" button, keeps the light off, and the digital display shows zero 5. Repeat steps 2-5 above until all samples are made 6. Turn off the power, clean the site, and wipe the testing machine clean7. Precautions for using the testing machine
1. The testing machine needs to be well grounded;
2. In order to maintain the accuracy of the appropriate force sensor, it is strictly prohibited to impact, twist, or lift the sensor body, and it is not allowed to use it beyond the rated load of the sensor 3. The internal potentiometer of the instrument has been adjusted at the factory, and generally, users should not adjust it 4. The accuracy of the testing machine should be verified after one year of use, and then verified every other year thereafter